In earlier parts, we considered a unity gain preamp with an ECC88 at its heart. The design was mostly conventional, but withal, a good performer, a unit that will not be the limitation in any reasonable system. Now it’s time to get unreasonable. And, unreasonable guy that I am, my target is that big, fat output coupling capacitor.
Flow and Eddy- A Philosophical Diversion
It’s time to talk about capacitors. Next to wire, caps are the bits which are most likely to induce audiophile neurosis. Living in dread fear of dielectric absorption, ESR, dissipation factor, and insufficient mysticism, the audiophile is a perfect target for those who would encourage the neurosis in the hope of selling a few plastic jellyrolls at platinum prices. On the rare occasions when the jellyroll peddlers (or merchants of similar energy-storage desserts) provide actual data to show the superiority of their particular polymer pastry, one thing seems to be universal- the data are shown for high signal currents, usually with an annotation that this is done to show the results more clearly. Well, THAT is interesting and points to a bit of electronic jiujitsu: if increasing signal current makes errors in cap vendors’ tests greater, then it makes sense that reducing the signal current should reduce such errors. No cap vendor seems to make their case at microamp levels…
Many lifetimes ago, I served a rigorous apprenticeship with the great designer Murray Zeligman. Murray is a very intuitive guy and one of his rules of thumb (and the man must have had about a million thumbs) was to use the smallest coupling cap possible in any circuit. In his view, the large capacitors in fashion at that time tended to “thicken” the sound in an unnatural way. As the Jesuits say, “Give me the boy and I’ll give you the man,” so Murray’s prejudice has never left me. And here we have a clue about why he might have been right.
Consider a basic RC coupling circuit. Very typical values in a tube circuit would be 0.1uF for the cap and 1M for the resistor. This results in a high-pass filter with a -3dB frequency of 1.6Hz, a decade below the (usual) lowest frequencies of interest. With that much margin, phase shift within the passband remains quite low. Following the dictum of “smaller is better,” we reduce the size of the capacitor tenfold to 0.01uF. We see that our -3dB frequency has likewise risen to 16Hz and the phase shift in the passband is now quite significant. Audible? Maybe, maybe not, but why have that phase shift there in the first place if it can be avoided? The curious reader might want to know why this bothers me, but the corresponding phase shift from the transformer doesn’t. Fortunately, the rolloff from the specified transformer is nearly two orders of magnitude lower, an astonishing 0.25 Hz. That coupling capacitor is indeed the choke point (bad pun). So the resistor must be correspondingly increased to 10M, a rather large value for most tube circuits, so large that grid leakage currents will often cause the biasing to go a bit haywire. In some cases, the resistance can be bootstrapped, and that can be useful, but it’s not a universally available option.
Since we entered with a notion about signal currents, let us consider them for these RC combinations. At a 2VRMS signal level, the current through the 0.1uF/1M combination is 2 microamps. Likewise, the current through the 0.01uF/10M high-pass is 0.2 microamps, a tenfold improvement. But in an absolute sense, both of these values are quite low.
Looking at the uglier part of the circuit, we have specified a load of 10kohm and have sized the output cap correspondingly: the -3dB frequency for a 10uF output capacitor and a 10k load is the same as the 0.01/10M just considered. But, look what has happened to the signal current- Ohm’s Law tells us that it has gone up by 3 decades, from 0.2 microamps to 0.2 milliamps. That is clearly not the direction we would want to go, and a reasonable assumption is that any defects caused by the capacitive coupling have likewise increased a thousandfold.
Making things worse is bulk. A 10uF capacitor is BIG. There’s a whole steaming PILE of dielectric that must have its polarization sloshed around several thousand times a second. Try this: take two capacitors with the same voltage rating but separated by a decade or more of capacitance. Unroll them and measure the relative area. Which one do you think will have less effect on the signal?
We’re unfortunately stuck with a 10uF cap if we want to drive a 10k load- or are we?
Pinning the Tail on Don Quixote
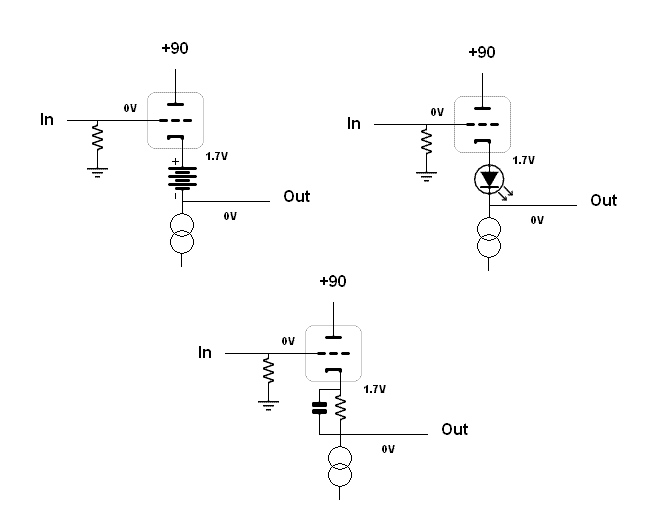
Name something better than a capacitor for getting a signal from point A to point B. Take your time, I’ll wait for you to- what’s that, you’ve got an answer? A piece of wire? That’s right! Even in the most fevered fantasy of the most deluded audiophile, the defects of a piece of wire are in a whole different league (a better one) than those of even the finest capacitor. The problem is DC. If the grid of the cathode follower is held at ground, the cathode must be offset by a couple of volts of DC above ground, not a healthy thing to thrust at an unsuspecting power amp. Likewise, if we hold the cathode at ground, the grid must be a couple of volts negative. There is no third choice.
Choice One (the grid at DC ground) is where we start from. Blocking DC from the output by using a cap is what put us in this quandary. So we must level shift the output. There are several ways to do this, but all have the disadvantage of running the signal through a rather non-ideal set of components (like a bypassed resistor or a battery or an LED).

I think we can set aside Choice One for the moment. Or longer.
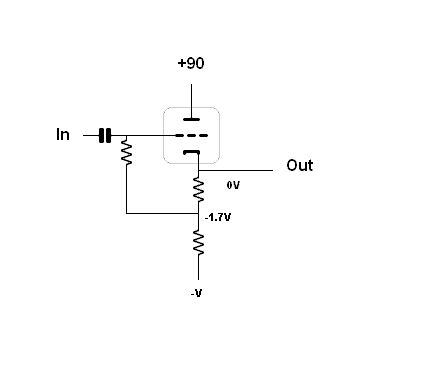
Choice Two (the grid biased negatively with the cathode at DC ground) can be implemented a few different ways. One is the bootstrap, as shown here:

In this circuit, the input grid leak resistor is returned to a point along the cathode load chosen so that the cathode side of the tap corresponds to the resistance necessary to get the desired DC grid-cathode bias voltage with the constraint of the cathode being at 0VDC. As mentioned above, this topology has the salutary effect of increasing the effective load that the grid-leak resistor presents to the coupling cap. But it will take some trimming to get any offset nulled; worse, from tube to tube and from degree Celsius to degree Celsius, the DC voltage on the cathode WILL wander about, no matter how carefully the circuit is trimmed.
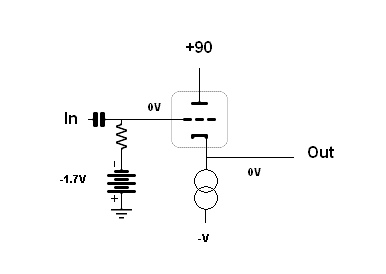
We can also put a negative voltage on the grid via its resistor. Symbolically, it would look like this:

In this sketch, the bias comes from a battery, but there are a large number of ways to derive that voltage; the large grid resistor makes the impedance of the negative voltage source rather nugatory for any reasonable values, so low noise, rather than dynamic impedance, is the primary design desiradatum. There are two problems to overcome: first, the trim/drift issues we just discussed. And now, a second, the lack of bootstrapping of the grid leak resistor, which loses us the advantage of using a smaller input capacitor. So, this would seemingly be a nonstarter, having doubled the number of design problems.
A hint that there might be a single solution available to solve both problems may be gleaned from the observation that the element to be trimmed in this latter implementation is a voltage rather than a resistance tap. In other words, if we can control the applied grid voltage, we can keep the cathode voltage at zero. And that inevitably leads us to the word “servo.”
The first implementation of DC servo-controlled cathode followers I ever saw was from David Berning, in some PAS-3 mods that eventually evolved into the Berning TF-10. He used an inverting IC integrator to sense the output of his buffer and feed back a signal that had a very high DC gain, but very low AC gain at audio frequencies. That signal was applied to the grid so that if the output tried to wander positive, the integrator would bite back fiercely with a negative response to the buffer’s input. And thirty years later, I still think that’s the best way to do it. IC op-amps are terrific at DC tasks and can clamp down that offset in a heroic fashion.
We Can Rebuild It, We Have the Technology
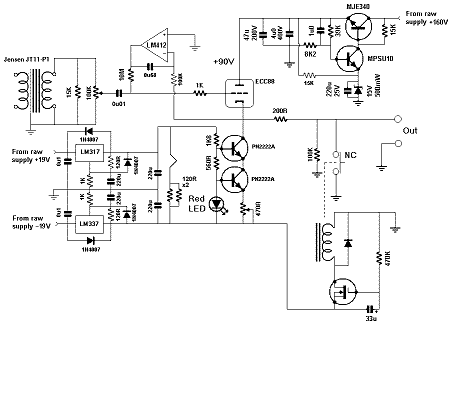
The application of a servo to our Heretical line stage is shown here (click for larger image):
We have jettisoned that awful output cap and replaced it with a bit of wire. We have moved the RC coupling to the input side of the tube, where a satisfyingly small capacitor will give us the desired low frequency response. We have wrapped an inverting integrator around the tube to keep the DC voltages nice and tidy and provide the bias for the grid. The integrator is referenced to ground and it will do its damnedest to provide whatever negative grid bias is necessary in order to keep the output at DC ground. The response of the integrator falls monotonically at 6dB/octave, so that by the time we reach the audio band, it has stepped aside quite politely. To ensure maximum politeness, an additional passive RC network can optionally be interposed between the integrator and the bottom of the grid leak resistor.
This point cannot be overemphasized: the integrator does NOT contribute an in-band signal! Let us see why that is so. First, there is the response of the integrator itself. For an integrator turnover frequency of 1Hz, the response will be down by 60dB at 1kHz.
Second, there is a reduction of the integrator’s output at AC because of the voltage divider formed by the very large grid leak resistor and the input impedance which shunts the tube’s grid to AC ground. We can estimate how much this helps as follows: At 1kHz, a 0.01uF capacitor has a reactance of about 16k. The 10k input resistor is paralleled by the source impedance of whatever is driving the preamp. Let’s do a worst-case and drive the preamp from an infinite source impedance (open circuit). The lower leg of the divider is then the quadrature sum of the capacitive reactance and the input resistor, which comes to about 18K. The voltage divider thus attenuates any 1kHz at the integrator output by 18k/(10M +18k) or roughly 0.018. Translated to decibels, we have a reduction of -55dB. So between the dropping response of the integrator and the voltage divider effect, the 1kHz worst-case contribution of the integrator is -115dB. With a typical low source impedance of a CD player or similar device, we can knock the servo signal down another 6dB…
I believe that we can forego any worries about the servo fouling our pristine midrange and treble; even at bass frequencies, it contributes a ridiculously small signal. The tradeoff for getting rid of the output capacitor is then only one of complication- there is now a higher parts count, but on the plus side, that output capacitor was probably not cheap. A handful of Radio Shack resistors, caps, and an op-amp cost a small fraction of a Teflon capacitor.
To Servo Mankind- A cookbook
There is a bit of a delicate matter to determine- the relationship between the servo time constant and the time constant of the input network. No doubt there is an analytical way to optimize their ratio, but in this case, I took the lazy empiricist’s way out- I moved the servo time constant around while listening to music with well-recorded bass. The effect is quite fascinating, with the sound ranging from bloated to anemic. The values shown in the schematic produced a very neutral sound. There is a relatively broad “sweet spot” where the effect of change was somewhere beyond evanescent. So don’t sweat it, especially if you do not have a monster woofer system. Experimenting with that time constant will give the curious constructor hours and hours of amusement; for me, I would be happy not to hear “This One’s For Blanton” again for a long, long time. Analytical listening is tedious.
The op-amp is not terribly critical, but it does need to be unity-gain stable. If you use the suggested FET input device or something similar, you can connect the non-inverting input directly to ground without fear of offset caused by bias currents. If you opt for a bipolar op-amp (and something like a 1458 works just fine here), connect the non-inverting input to ground via a 100k resistor. Because this is basically a DC circuit, the parts are not critical, but it is probably worthwhile to use a good quality (though non-fancy) capacitor for the integrator. I used an inexpensive polypropylene unit. The input cap to the buffer can advantageously use that fancy cap, but on the bright side, a 0.01uF Teflon capacitor is much, much cheaper than a comparable 10uF unit, and is on a par with the price of a 10uF polypropylene of moderate pretension.
My construction technique is, as mentioned before, quite laughable. But it is functional. The circuit elements were each constructed on separate perf boards, tested, then interconnected. Regardless of the chosen method, it is a good idea to place the grid leak resistor close to the grid connection. Thus the lead length between the servo and the buffer circuitry becomes much less important, a consideration for constructions that have the servo circuit on an outrigger board.


I’m installing a design similar to this in two long-term projects. Both use an integrator sensing the DC output of a cathode follower to control the voltage at its grid. Both also drive the follower through a coupling cap from a triode amplifier stage. What you witnessed regarding variable bass response isn’t something I would have expected, and I wonder if you ever revisited this issue in order to better correlate the audible results with electrical measurements? My Spice sims do indicate a near-180º shift in the low-bass region. However, loop gain at those frequencies is typically -70 to -60 dB, depending on exact values. After reading your comments, I’m wondering if it might be preferable to increase the values of both the coupling cap and the integrator time constant. That would push the phase shift to lower frequencies outside the audio band, while simultaneously reducing loop gain in the audible range even further. The only downside I see to this is increased response time, but that’s not an issue in my particular applications. I would be interested to hear any additional thoughts you might have on this issue.
I haven’t gone back to look at this, but I should. These days, I have much better test equipment (AP).
I’m close to buttoning up the first of the projects now that use this technique. This one is a large SET amplifier with a direct-coupled driver (follower). No indication in bench testing that the bias controller has any impact on bass response. Small signal response extends well below 20Hz, and I measure no additional low frequency phase shift as a result of the controller. This project has spanned quite a few years and spawned a number of sub-projects. I’m not eager to use it for experiments at this point. However, up soon is a full-function preamp that I started some time ago that’s about 80% complete. That one might be more convenient for tests. I’ll let you know if I uncover anything of note regarding the time constant.
So this project is mostly complete, only minor cosmetic work remaining (wood side panels). Listening to it now, the sound is superb, very open and detailed. I pursued a topology during this project to add feedback from the cathode follower output to the grid of the input tube (triode-mode EF86). This was primarily for the purpose of reducing gain to a more manageable level, but it also pushes THD down below .002% at typical listening levels. I’ve never designed anything with tubes this complex – multiple power supplies, controller circuitry, protection circuitry, four-stage tone controls (ala Max Robinson), modified RCA phono, etc., etc. Very glad to have this done!
Almost forgot, here’s a pic of it in operation:
https://audiokarma.org/forums/index.php?threads/7-channel-home-theater-project.1012255/post-17551221
You’re reminding me that I really, really want a Bridgeport.
I bought a Taig CNC benchtop mill specifically for this hobby about 12 years go. That enables me to do all the chassis work and engraving myself. A full-size mill would save time on the “coarser” operations like squaring up, but I don’t have the necessary space. Incidentally, I haven’t experienced any issues with bass response. The line stage is really excellent, and only a single 4,700pF polystyrene coupling cap is present in the entire signal path (between the gain stage and cathode follower). I credit that and the direct coupled output with the significant nuance this circuit achieves. I really appreciate you putting the Heretical article online. I had thought about something like this for years, and it was your work that gave me the incentive to move forward. 😉